Showing posts with label javascript. Show all posts

Monday, February 7, 2011

Hiding the Name.dll ActiveX Control

If you are working on a public-facing Internet site, you should be aware that SharePoint may show a particularly annoying message at the top of Internet Explorer like shown below (This website wants to run the following add-on: ‘Name ActiveX Control’ from ‘Microsoft Corporation’: If you trust the website and the add-on and want to allow it to run, click here…)

NameDll

The message asks the user to run the Name.dll ActiveX Control add-on because the users don’t the SharePoint Server added to their trusted sites list. This control enables presence information to be displayed for authenticated users in SharePoint, and typically shows their availability in external Instant Messaging programs from inside SharePoint. Since anonymous users don’t really need this functionality you can turn off this message by using one of the following method:

  • In SharePoint 2010 the message can be turned off from Central Administration –> Manage Web Applications –> General Settings. Simply set Enable the Person Names Smart Tag and Online Status for Members to No. This will turn off the presence information and remove the ActiveX message for the entire web application.
  • Alternatively you can you can disable the message and functionality from a custom master page. Simply add the following code to your master page:

<script type=”text/javascript”>
    function ProcessImn(){}
    function ProcessImnMarkers(){}
</script>

This JavaScript code overrides the functions in SharePoint that cause this ActiveX message.

Friday, November 12, 2010

Deleting Data Using Silverlight and Javascript Client Object Model

Silverlight

private void Delete_Click(object sender, RoutedEventArgs e)
{
    ClientContext ctx = new ClientContext("Your Server Here");
    CamlQuery query = new CamlQuery();
    query.ViewXml = "<View><Query><OrderBy><FieldRef Name=\"Editor\" Ascending=\"False\" /></OrderBy></Query></View>";
    List announcements = ctx.Web.Lists.GetByTitle("Announcements");

    ListItemCollection listItems = announcements.GetItems(query);
    ctx.Load(listItems);
    ctx.ExecuteQueryAsync((s, args) =>
    {
        ListItem lastItem = listItems[listItems.Count - 1];
        lastItem.DeleteObject();
        announcements.Update();
        ctx.ExecuteQueryAsync((s1, args1) =>
        {
            Dispatcher.BeginInvoke(() =>
            {
                label1.Content = "Last record deleted";
            });
        }, null);
    }, (s, args) =>
    {
        Dispatcher.BeginInvoke(() =>
        {
            label1.Content = args.Message;
        });
    });
}

Javascript

function Delete_Click() {
    var ctx = new SP.ClientContext.get_current();
    var query = new SP.CamlQuery();
    query.viewXml = "<View><Query><OrderBy><FieldRef Name=\"Editor\" Ascending=\"False\" /></OrderBy></Query></View>";
    var announcements = ctx.get_web().get_lists().getByTitle("Announcements");
    var listItems = announcements.getItems(query);

    ctx.load(listItems, "Include(Title)");
    ctx.executeQueryAsync(function (s, args) {
        var lastItem = listItems.get_item(listItems.get_count() - 1);
        lastItem.deleteObject();
        announcements.update();
        ctx.executeQueryAsync(function (s, args) {
            var console = document.getElementById('DemoConsole');
            console.innerHTML = " Last Item Deleted";
        }, null);
    }, null);
}

For more information on Silverlight and JavaScript Client Object Model, see below:

Thursday, November 11, 2010

Updating Data Using Silverlight and Javascript Client Object Model

Silverlight

private void Update_Click(object sender, RoutedEventArgs e)
{
    ClientContext ctx = new ClientContext("Your Server Here");
    CamlQuery query = new CamlQuery();
    query.ViewXml = "<View><Query><OrderBy><FieldRef Name=\"Editor\" Ascending=\"False\" /></OrderBy></Query></View>";
    List announcements = ctx.Web.Lists.GetByTitle("Announcements");

    ListItemCollection listItems = announcements.GetItems(query);
    ctx.Load(listItems);
    ctx.ExecuteQueryAsync((s, args) =>
    {
        foreach (var item in listItems)
        {
            item["Title"] = "Updated";
            item.Update();
        }
        ctx.ExecuteQueryAsync((s1, args1) =>
        {
            Dispatcher.BeginInvoke(() =>
            {
                label1.Content = "Records Updated";
            });
        }, null);
    }, (s, args) =>
    {
        Dispatcher.BeginInvoke(() =>
        {
            label1.Content = args.Message;
        });
    });
}

Javascript

function Update_Click() {
    var ctx = new SP.ClientContext.get_current();
    var query = new SP.CamlQuery();
    query.viewXml = "<View><Query><OrderBy><FieldRef Name=\"Editor\" Ascending=\"False\" /></OrderBy></Query></View>";
    var announcements = ctx.get_web().get_lists().getByTitle("Announcements");
    var listItems = announcements.getItems(query);

    ctx.load(listItems, "Include(Title)");
    ctx.executeQueryAsync(function (s, args) {
        var itemEnum = listItems.getEnumerator();
        while (itemEnum.moveNext()) {
            var item = itemEnum.get_current();
            item.set_item("Title", "JavaScript Update");
            item.update();
        }
        ctx.executeQueryAsync(function (s, args) {
            var console = document.getElementById('DemoConsole');
            console.innerHTML = "JavaScript Update Completed";
        }, null);
    }, null);
}

For more information on Silverlight and JavaScript Client Object Model, see below:

Adding Data Using Silverlight and Javascript Client Object Model

Silverlight

private void Add_Click(object sender, RoutedEventArgs e)
{
    ClientContext ctx = new ClientContext("Your Server Here");
    List announcements = ctx.Web.Lists.GetByTitle("Announcements");

    ListItemCreationInformation createInfo = new ListItemCreationInformation();
    ListItem newItem = announcements.AddItem(createInfo);
    newItem["Title"] = "A new item";
    newItem.Update();
    ctx.ExecuteQueryAsync((s, args) =>
    {
        Dispatcher.BeginInvoke(() =>
        {
            label1.Content = "Item Added";
        });
    }, (s, args) =>
    {
        Dispatcher.BeginInvoke(() =>
        {
            label1.Content = args.Message;
        });
    });
}

Javascript

function Add_Click() {
    var ctx = new SP.ClientContext.get_current();
    var announcements = ctx.get_web().get_lists().getByTitle("Announcements");

    var createInfo = new SP.ListItemCreationInformation();
    var newItem = announcements.addItem(createInfo);
    newItem.set_item("Title", "A new javascript item");
    newItem.update();

    ctx.executeQueryAsync(function (s, args) {
        var console = document.getElementById("DemoConsole");
        console.innerHTML = "Add Completed";
    }, null);
}

For more information on Silverlight and JavaScript Client Object Model, see below:

Wednesday, November 10, 2010

Retrieving Data Using Silverlight and JavaScript Client Object Model

Sliverlight

private void CAMLQuery_Click(object sender, RoutedEventArgs e)
{
    ClientContext ctx = new ClientContext("Your site here");
    CamlQuery query = new CamlQuery();
    query.ViewXml = "<View><Query><OrderBy><FieldRef Name=\"Editor\" Ascending=\"False\" /></OrderBy></Query></View>";

    List announcements = ctx.Web.Lists.GetByTitle("Announcements");
    FieldCollection fields = announcements.Fields;
    ctx.Load(fields);

    ListItemCollection listItems = announcements.GetItems(query);
    ctx.Load(listItems);
    ctx.ExecuteQueryAsync((s, args) =>
    {
        Dispatcher.BeginInvoke(() =>
        {
            BuildTable(fields, listItems);
        });
    }, (s, args) =>
    {
        Dispatcher.BeginInvoke(() =>
        {
            label1.Content = args.Message;
        });
    });
}

JavaScript

function CAMLQuery_Click() {
    var ctx = new SP.ClientContext.get_current();
    var query = new SP.CamlQuery();
    query.viewXml = "<View><Query><OrderBy><FieldRef Name=\"Editor\" Ascending=\"False\" /></OrderBy></Query></View>";
    var announcements = ctx.get_web().get_lists().getByTitle("Announcements");
    var listItems = announcements.getItems(query);
    ctx.load(listItems);
    var fields = announcements.get_fields();
    ctx.load(fields);
    ctx.executeQueryAsync(function (s, args) {
        var console = document.getElementById('DemoConsole');
        console.innerHTML = buildTable(fields, listItems);
    }, null);
}

For more information on Silverlight and JavaScript Client Object Model, see below:

Monday, November 8, 2010

How To Referencing the JavaScript Client Object Model

The following are simple steps to show how you can hooks your SharePoint page with JavaScript Client Object Model:

  1. From the Site Actions menu, choose New Page. Name the new page JSClientObjectModelTest.
  2. From the Page tab in the ribbon, click Save.
  3. Also from the Page tab, click the arrow under the Edit button and select Edit In SharePoint Designer.
  4. In SharePoint Designer, from the Home tab on the ribbon, select Advanced Mode.
  5. In the Content control with the ID PlaceHolderAdditionalPageHead, add the following markup after the SharePoint:RssLink tag (on one line):

    <SharePoint:ScriptLink runat="server" Name="sp.js" Localizable="false" LoadAfterUI="true"/>


  6. Scroll to the bottom of the page, and before the WebPartPage:WebPartZone tag, add the following markup (on one line):

    <script type="text/javascript" src="../SilverlightControls/JScriptTest.js" ></script>
    <div id="DemoConsole"></div>


  7. Click the Save icon in the upper-left corner of the window to save the changes to SharePoint. Click Yes in the Site Definition Page Warning.

For more information on Silverlight and JavaScript Client Object Model, see below:

Tuesday, August 4, 2009

Implementing Mouse Hover & Click Highlighting in Default List View

Brad has a great post on how to Hover (MouseOver) Highlight and Click to Stay Highlighted in a SharePoint List and the BEST thing he did mentioned my name (“a guy called Sukri”) – Thanks Brad.

Note:

The entire solution step by step with code segment can be found at CustomWare site: SharePoint - Customising List Default View - Implementing mousehover & click highlighting in Default List View

Tuesday, July 14, 2009

“Open tool pane” link in Web Part for SharePoint

If you want to display “Open tool pane” link in Web Part for SharePoint, just like the one displayed in the Content Editor Web Part and several others out-of-the-box Web Parts. Then add the following JavaScript code to your Web Part class:

lblErrorMessage.text = "<a href=\"javascript:MSOTlPn_ShowToolPane2Wrapper('Edit', this,'" + this.ID + "')\">Open tool pane</a>"

Get source code here:

Screenshots

  • Figure 1: Display “Open tool pane” link in the Web Part content

image

  • Figure 2: User clicked on the “Open tool pane” link

image

Friday, April 24, 2009

Trigger JavaScript Events When a Choice (Radio Button) SharePoint Field Type is Clicked

Brad has provided a workaround on how to use a JavaScript technique to manipulate SharePoint Form Field using SharePoint Designer 2007. The code in his blog supported the following SharePoint Field Types, but NOT Choice (Radio Buttons) field type:

  • Single Line of Text
  • Multiple Lines of Text
  • Number
  • Currency
  • Choice (dropdown)
  • Lookup (single)
  • Lookup (multiple)
  • Yes/No

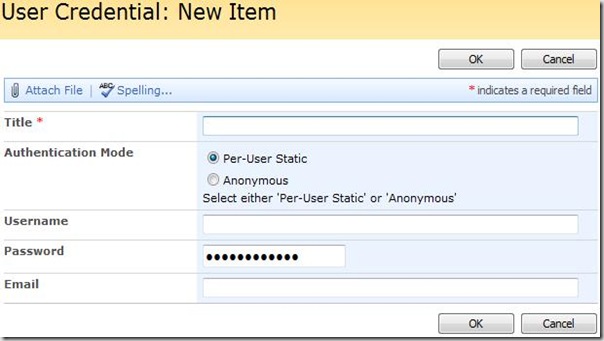
Let say you have a requirement from a customer to develop a SharePoint list for storing user credentials which has the following UI mock-up:
UserCredential1

The requirement stated that when ‘Anonymous’ authentication mode radio button is selected, hide Username and Password textbox else display Username and Password textbox.

The following are steps required to add JavaScript to the SharePoint Form List page (NewForm.aspx and EditForm.aspx):

  • Open NewForm.aspx using Microsoft SharePoint Designer 2007 (i.e. http://<<sharepoint_servername:port_number/Lists/User Credential/NewForm.aspx)
  • Locate the <asp:Content ContentPlaceHolderId="PlaceHolderMain" runat="server"> tag and paste the following JavaScript just below the tag:

<script language="javascript" type="text/javascript">

    _spBodyOnLoadFunctionNames.push("selectedAuthenticationMode");

    function selectedAuthenticationMode() {
        // to get the array for radio buttons
        var myRadioButtonsArray = getTagFromIdentifierAndTitle("input", "RadioButtons", "Authentication_x0020_Mode");
        for (var x = 0; x < myRadioButtonsArray.length; x++) {
            if (myRadioButtonsArray[x].value == 'ctl00') // per-user static authentication mode
            {
                // create client event handler - onclick
                myRadioButtonsArray[x].parentElement.onclick = function() {
                    // display username and password textbox                   
                    var controlUserName = findacontrol("Username");
                    controlUserName.parentNode.parentNode.style.display = "";
                    var controlPassword = findacontrol("Password");
                    controlPassword.parentNode.parentNode.style.display = "";
                };
            }
            else // anonymous authentication mode
            {
                // create client event handler - onclick
                myRadioButtonsArray[x].parentElement.onclick = function() {
                    // unhide username and password field                   
                    var controlUserName = findacontrol("Username");
                    controlUserName.parentNode.parentNode.style.display = "none";
                    var controlPassword = findacontrol("Password");
                    controlPassword.parentNode.parentNode.style.display = "none";
                };
            }
        }
    }

    function getTagFromIdentifierAndTitle(tagName, identifier, title, option) {
        var len = identifier.length;
        var tags = document.getElementsByTagName(tagName);
        for (var i = 0; i < tags.length; i++) {
            var idString = tags[i].id;
            var nameString = tags[i].name;
            // get selected radio button value only
            if (option == "value" && tags[i].type == "radio" && (identifier == "RadioButtons" && nameString.indexOf(identifier) == nameString.length - len)) {
                var tagParentHTML = tags[i].parentElement.parentElement.parentElement.parentElement.parentElement.parentElement.parentElement.innerHTML;
                if (tagParentHTML.indexOf('FieldInternalName="' + title + '"') > -1) {
                    var radioButtons = document.getElementsByName(nameString);
                    var radioValue = "";
                    for (var x = 0; x < radioButtons.length; x++) {
                        if (radioButtons[x].checked) {
                            radioValue = radioButtons[x].parentElement.title;
                            break;
                        }
                    }
                    var o = document.createElement("INPUT");
                    o.type = "hidden";
                    o.value = radioValue;
                    return o;
                }
            }
            // get radio buttons group
            if (tags[i].type == "radio" && (identifier == "RadioButtons" && nameString.indexOf(identifier) == nameString.length - len)) {
                var tagParentHTML = tags[i].parentElement.parentElement.parentElement.parentElement.parentElement.parentElement.parentElement.innerHTML;
                if (tagParentHTML.indexOf('FieldInternalName="' + title + '"') > -1) {
                    return document.getElementsByName(nameString);
                }
            }
            // all other input or select type
            else if (tags[i].title == title && (identifier == "" || idString.indexOf(identifier) == idString.length - len)) {
                return tags[i];
            }
        }
        return null;
    }

    function findacontrol(FieldName) {
        var arr = document.getElementsByTagName("!");
        // get all comments
        for (var i = 0; i < arr.length; i++) {
            // now match the field name
            if (arr[i].innerHTML.indexOf('FieldInternalName=\"' + FieldName + '\"') > -1) {
                return arr[i];
            }
        }
    }
</script>

  • Save NewForm.aspx and preview in the Browser
  • Repeat the steps for EditForm.aspx

Instead of having to create a new custom Web Part or a XSLT List Form page for a SharePoint List, this approach provides uncomplicated customization and the best thing is the out-of-the-box functionalities of the List Form View for a SharePoint List are still intact.

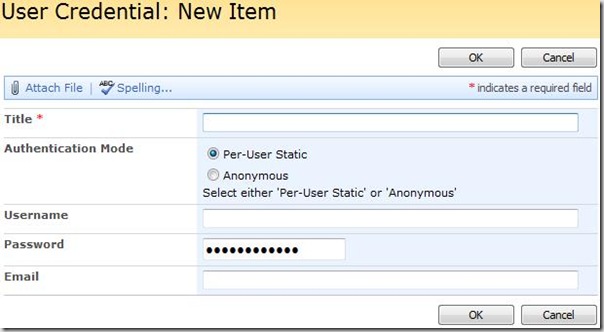
Sample Screenshot

  • User chooses ‘Anonymous’ authentication mode radio button:

UserCredential2

  • User chooses ‘Per-User Static’ authentication mode radio button:
UserCredential1