Showing posts with label sharepoint branding. Show all posts

Thursday, March 24, 2011

Customise SharePoint v4 Master Page to Hide Recycle Bin and All Site Content Links

The following steps walk you through the process of making this common SharePoint customization:

  • Create a custom master page SharePointMalaya.master from v4.master. For details information on how to create this master page, see Customise SharePoint v4 Master Page to Add Footer.
  • Edit the CustomFooter.master file by clicking on the Edit File button.
  • From the ribbon, click the Skewer Click button, as shown in Figure below. This enables you to see the CSS that is being applied to a specific object.

image

  • With Skewer Click selected, hover over the area near where the Recycle Bin and All Site Content links are located. Move your mouse around the area and you should see the name PlaceHolderQuickLaunchBottom appear faintly.

image

  • Select it and another window will open displaying a list of styles. Click the style called ul.s4-specialNav…, as shown in
    figure below.

image

  • Before you can edit the CSS, you must first add a new panel to SPD. From the ribbon, click the Style tab and select the CSS Properties button.
  • When the new panel opens, you’ll see the top section is called Applied Rules. The style you want to modify (.s4specialNavLinkList) should already be selected as shown in figure below.

image

  • Right click the style and select New Style Copy.

image

  • At the top of the New Style dialog shown in figure below, set the new style to be defined in the “Current page”. Be sure to check the box “Apply new style to document selection”. Then select the Layout category and set the “visibility” to “hidden”. Click OK.

image

  • Save the changes made to the master page.
  • Now open your site in the web browser, you’ll see that a footer has been applied to your site, as shown below:

image

Customise SharePoint v4 Master Page to Add Footer

The following are steps of creating a custom master page to add a footer by using SharePoint Designer 2010.

  • Open your site in SharePoint Designer 2010 and click the Master Pages link in the Navigation pane.
  • Right click v4.master and select Copy.

image

  • Right click and paste another copy of the file into the Master Pages gallery.
  • From the Master Pages gallery, click next to the filename for the master page that was just
    created. From the ribbon, click the Rename button. Rename the file SharePointMalayaFooter.master.

image

  • Select the file SharePointMalayaFooter.master and then, from the ribbon, click the Edit File button.
  • Ensure that either the Split or Code view is showing. Near line 624, after <SharePoint:DeveloperDashboard runat=“server”/>, add the following code snippet:

<div class="s4-notdlg" style="clear: both; background-color:#FEAD30; padding: 10px;">&copy; Copyright 2011 SharePoint Malaya</div>

image

  • After you’ve made the change, save the fi le by clicking the Save icon in the upper left-hand corner of the screen. You will get a dialog that warns you that you are about to customize the file from the site definition. Click Yes to continue.

image

  • Click the Master Page link again from the Navigation pane on the left to return to the Master Pages gallery.
  • To apply the changes to the site, select SharePointMalayaFooter.master and then, from the ribbon, click the Set as Default button.
  • Now open your site in the web browser, you’ll see that a footer has been applied to your site, as shown below:

image

Monday, February 7, 2011

How to Show Favicon In SharePoint 2010

Favicons are the little shortcut icons that appear in most modern browsers next to bookmarks, as well as in the address bar next to the site’s URL and on browser tabs - check out Wikipedia about Favicon.

SharePoint 2010 makes it very easy to add a favicon to custom master pages using the following code:

<SharePoint:SPShortcutIcon runat=”server” IconUrl=”/Style Library/Images/SPMalayaFavIcon.ico”/>

Favicon

Please note that when testing favicons Internet Explorer, if you are having trouble seeing a new favicon and you are certain that the code and the image are set up correctly, it may help to clear your browser cache, make a new bookmark, or even close and
reopen the browser.

Hiding the Name.dll ActiveX Control

If you are working on a public-facing Internet site, you should be aware that SharePoint may show a particularly annoying message at the top of Internet Explorer like shown below (This website wants to run the following add-on: ‘Name ActiveX Control’ from ‘Microsoft Corporation’: If you trust the website and the add-on and want to allow it to run, click here…)

NameDll

The message asks the user to run the Name.dll ActiveX Control add-on because the users don’t the SharePoint Server added to their trusted sites list. This control enables presence information to be displayed for authenticated users in SharePoint, and typically shows their availability in external Instant Messaging programs from inside SharePoint. Since anonymous users don’t really need this functionality you can turn off this message by using one of the following method:

  • In SharePoint 2010 the message can be turned off from Central Administration –> Manage Web Applications –> General Settings. Simply set Enable the Person Names Smart Tag and Online Status for Members to No. This will turn off the presence information and remove the ActiveX message for the entire web application.
  • Alternatively you can you can disable the message and functionality from a custom master page. Simply add the following code to your master page:

<script type=”text/javascript”>
    function ProcessImn(){}
    function ProcessImnMarkers(){}
</script>

This JavaScript code overrides the functions in SharePoint that cause this ActiveX message.

Thursday, February 3, 2011

Turn Off Warning Message On Unsupported Browsers in SharePoint 2010

Browser support in SharePoint 2010 has been greatly improved over SharePoint 2007, check out Technet’s Browser Support Matrix for SharePoint 2010. However Internet Explorer 6 (IE6) and other commonly used browsers are not browsers SharePoint 2010 supports from a content-authoring perspective. When you open a SharePoint page using IE6 browser, the following simple message will be displayed in the message box:

“Your Web browser will have problems displaying this web page. Changes to the sites may not function properly. For a better experience please update your browser to its latest version.”

WarningLegacyBrowser

Let say you are able to create a specific master page that works for anonymous IE6 users but how to turn off the warning message for all users with legacy unsupported browsers like IE6?

It’s simple! Find the following line at the bottom of the out-of-the-box master pages:

<SharePoint:WarnOnUnsupportedBrowsers runat=”server”/>

If you want to turn off the warning message for all users, you can simply remove it from master pages.

Wednesday, February 2, 2011

How To Turn Off Master Pages Applying to Application Pages

You may not want your custom branding to apply to the application pages, normally the way I do this is by not applying custom master page to SharePoint 2010 as the System Master Page. But wait, although this method prevents the application pages from showing the custom branding, but it also prevents the branding from showing on any nonpublising page too :(

I found a better way to do this that is by stop master pages from applying to application pages by turning off the feature completely from Central Administration, as follows:

  • Open Central Administration on the SharePoint server.
  • Under Application Management, click Manage web applications.
  • Select the desired web application from the list, and then from the ribbon, click General Settings.
  • In the dialog that appears, scroll down to Master Page Setting for Application _Layouts Pages and select No.
  • Scroll to the bottom of the dialog and click OK.

MasterPageSettingsForLayoutPage

    Now custom master pages for this entire web application will not apply to the application pages.

    Tuesday, August 4, 2009

    Implementing Mouse Hover & Click Highlighting in Default List View

    Brad has a great post on how to Hover (MouseOver) Highlight and Click to Stay Highlighted in a SharePoint List and the BEST thing he did mentioned my name (“a guy called Sukri”) – Thanks Brad.

    Note:

    The entire solution step by step with code segment can be found at CustomWare site: SharePoint - Customising List Default View - Implementing mousehover & click highlighting in Default List View

    Saturday, July 18, 2009

    Adding Drop-Down Menu Items to SPGridView Using SPMenuField Control

    When displaying custom data through SPGridView you won’t get the same look and feel of the default SharePoint List View. SPMenuField provides a data bound drop-down menu to be used in place of BoundField, TemplateField, or similar controls.

    The following describe steps required to add drop-down menu items to a SPGridView control in Web Part.

    • Create a Web Part
      • Add project references: Microsoft.SharePoint and System.Web
      • Add the following namespaces to your class:

    using System.Web.UI;
    using System.Web.UI.WebControls;
    using System.Data;
    using System.Collections.Generic;
    using Microsoft.SharePoint.WebControls;
    using Microsoft.SharePoint.WebPartPages;

      • Inherits your class with Microsoft.SharePoint.WebPartPages.WebPart

    public class SampleGrid : WebPart
    {
    }

    • Override CreateChildControls method, create the ObjectDataSource, SPGridView, SPGridViewPager and SPMenuField controls as shown below:

    protected override void CreateChildControls()
    {
        // Why UseDefaultStyles = false?
        // See http://sharepointmalaya.blogspot.com/2009/07/how-to-make-spgridview-to-have-same.html for details
        this.UseDefaultStyles = false;

        // ObjectDataSource
        ObjectDataSource dataSource = new ObjectDataSource();
        dataSource.ID = "dataSource";
        dataSource.SelectMethod = "SelectData";
        dataSource.TypeName = this.GetType().AssemblyQualifiedName;
        dataSource.ObjectCreating += new ObjectDataSourceObjectEventHandler(objectCreating);
        this.Controls.Add(dataSource);

        // SPGridView
        spGridView = new SPGridView();
        spGridView.ID = "spGridView";
        spGridView.DataSourceID = dataSource.ID;
        spGridView.AutoGenerateColumns = false;
        spGridView.AllowPaging = true;
        spGridView.PageSize = 10;
        spGridView.AllowSorting = true;
        spGridView.EmptyDataText = string.Empty;
        this.Controls.Add(spGridView);

        // SPGridViewPager
        pager = new SPGridViewPager();
        pager.GridViewId = spGridView.ID;
        this.Controls.Add(pager);

        // SPMenuField - Name field
        SPMenuField nameCol1 = new SPMenuField();
        nameCol1.HeaderText = "Name";
        nameCol1.TextFields = "Name";
        nameCol1.NavigateUrlFields = "Name,Email,WebSite";
        nameCol1.NavigateUrlFormat = "/_layouts/sharepointmalaya/DispDetails.aspx?WebPartID=" + this.ID + "&FilterName={0}&ReturnUrl=" + Page.Request.Url.ToString();
        nameCol1.TokenNameAndValueFields = "KEYNAME=Name,KEYEMAIL=Email,KEYWEBSITE=WebSite";
        nameCol1.SortExpression = "Name";
        nameCol1.MenuTemplateId = "menuTemplate";

        // MenuTemplate
        MenuTemplate menuTemplate = new MenuTemplate();
        menuTemplate.ID = "menuTemplate";
        this.Controls.Add(menuTemplate);
        spGridView.Columns.Add(nameCol1);

        // MenuTemplate - View Item
        MenuItemTemplate menuItemTemplate0 = new MenuItemTemplate("View Item", "~/_layouts/images/LIST.GIF");
        menuItemTemplate0.ClientOnClickNavigateUrl = "/_layouts/sharepointmalaya/DispDetails.aspx?WebPartID=" + this.ID + "&FilterName={%KEYNAME%}&ReturnUrl=" + Page.Request.Url.ToString();
        menuTemplate.Controls.Add(menuItemTemplate0);

        // MenuTemplate - Seperator
        MenuSeparatorTemplate menuSepTemplate = new MenuSeparatorTemplate();
        menuTemplate.Controls.Add(menuSepTemplate);

        // MenuTemplate - Open WebSite
        MenuItemTemplate menuItemTemplate1 = new MenuItemTemplate("Open WebSite", "~/_layouts/images/ASP16.GIF");
        menuItemTemplate1.ClientOnClickNavigateUrl = "javascript:window.open('%KEYWEBSITE%');";
        menuTemplate.Controls.Add(menuItemTemplate1);

        // MenuTemplate - Send Email
        MenuItemTemplate menuItemTemplate2 = new MenuItemTemplate("Send Email", "~/_layouts/images/EML16.GIF");
        menuItemTemplate2.ClientOnClickScript = "javascript:document.location.href='MailTo:%KEYEMAIL%;'";
        menuTemplate.Controls.Add(menuItemTemplate2);

        // BoundField - Email field
        BoundField nameCol2 = new BoundField();
        nameCol2.DataField = "Email";
        nameCol2.SortExpression = "Email";
        nameCol2.HeaderText = "Email";
        spGridView.Columns.Add(nameCol2);

        // BoundField - WebSite field
        BoundField nameCol3 = new BoundField();
        nameCol3.DataField = "WebSite";
        nameCol3.SortExpression = "WebSite";
        nameCol3.HeaderText = "WebSite";
        spGridView.Columns.Add(nameCol3);

        this.ChildControlsCreated = true;
    }

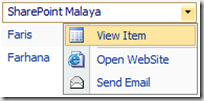
    • Code above create three (3) drop-down menu items and a separator menu as shown below:
    image

    • Clicking on the “View Item” redirects to custom page in the _layouts folder. When clicking on the “Open WebSite”, it opens web site and “Send Email” menu open client email form.
    • Please note SPMenuField has a property TokenNameAndValueFields which can be used to store token names and values in the following format:

    SPMenuField.TokenNameAndValueFields = "KEYNAME=Name,KEYEMAIL=Email,KEYWEBSITE=WebSite";

    • To consume SPMenuField token values, you must specify token name within the % sign as shown below:

    “%TOKEN_NAME%” OR “%KEYWEBSITE%”

    • As shown in code example above, ObjectDataSource control require “SelectData” method. You need to create a public method SelectData which returns a System.Data.DataTable – a dummy data which has three (3) columns which are “Name”, “Email” and “WebSite”. See below:

    public DataTable SelectData()
    {
        DataTable table = new DataTable();
        table.Columns.Add("Name");
        table.Columns.Add("Email");
        table.Columns.Add("WebSite");

        table.Rows.Add("SharePoint Malaya","sharepointmalaya@gmail.com","http://sharepointmalaya.blogspot.com");
        table.Rows.Add("Faris","faris@gmail.com","http://sharepointmalaya.blogspot.com");
        table.Rows.Add("Farhana","farhana@gmail.com","http://sharepointmalaya.blogspot.com");

        return table;
    }

    • In addition, ObjectDataSource control implement event handler ObjectCreating – You also need to create instance containing the event data as shown below:

    private void objectCreating(object sender, ObjectDataSourceEventArgs e)
    {
        e.ObjectInstance = this;
    }

    • Next, bind the data with the SPGridView control as shown below:

    protected override void Render(HtmlTextWriter writer)
    {
        if (ChildControlsCreated)
            spGridView.DataBind();
        base.Render(writer);
    }

    • Build and deploy to SharePoint site. That’s it – All Done. See below for screenshot:

    image

    Get sample code here:

    Friday, July 17, 2009

    How to Make SPGridView To Have Same Look And Feel Of The Out Of The Box SharePoint List View

    When you attempt to develop a Web Part that uses an SPGridView control, you’ll notice the following differences to your SPGridView look and feel compared to the out of the box SharePoint List View:

    • SPGridView font type is Verdana, out of the box SharePoint List View font type is Tahoma
    • Font size and colour different
    • No alternating styles for items
    • Header style, pager styles, etc.

    Screenshot below shows the differences:

     image

    If you’re good in CSS and HTML, then you’ll find CSS Reference Chart for SharePoint 2007 is helpful and you should be able to change your SPGridView styles to have the same look and feel of of the out of the box SharePoint List View.

    Instead of doing above you can assign the WebPart.UseDefaultStyles of your Web Part to false. See code below:

    protected override void CreateChildControls()
    {
        this.UseDefaultStyles = false;

    By setting the UseDefaultStyles to false, your SPGridView styles will have the same look and feel of the out of the box SharePoint List View. See screenshot below:

    image

    Please note that UseDefaultStyles only applicable for SharePoint Web Part and not ASP.NET Web Part – for ASP.NET Web Part please use SPChromeSettings.UseDefaultStyles.

    Tuesday, July 14, 2009

    “Open tool pane” link in Web Part for SharePoint

    If you want to display “Open tool pane” link in Web Part for SharePoint, just like the one displayed in the Content Editor Web Part and several others out-of-the-box Web Parts. Then add the following JavaScript code to your Web Part class:

    lblErrorMessage.text = "<a href=\"javascript:MSOTlPn_ShowToolPane2Wrapper('Edit', this,'" + this.ID + "')\">Open tool pane</a>"

    Get source code here:

    Screenshots

    • Figure 1: Display “Open tool pane” link in the Web Part content

    image

    • Figure 2: User clicked on the “Open tool pane” link

    image

    Friday, April 24, 2009

    Trigger JavaScript Events When a Choice (Radio Button) SharePoint Field Type is Clicked

    Brad has provided a workaround on how to use a JavaScript technique to manipulate SharePoint Form Field using SharePoint Designer 2007. The code in his blog supported the following SharePoint Field Types, but NOT Choice (Radio Buttons) field type:

    • Single Line of Text
    • Multiple Lines of Text
    • Number
    • Currency
    • Choice (dropdown)
    • Lookup (single)
    • Lookup (multiple)
    • Yes/No

    Let say you have a requirement from a customer to develop a SharePoint list for storing user credentials which has the following UI mock-up:

    UserCredential1

    The requirement stated that when ‘Anonymous’ authentication mode radio button is selected, hide Username and Password textbox else display Username and Password textbox.

    The following are steps required to add JavaScript to the SharePoint Form List page (NewForm.aspx and EditForm.aspx):

    • Open NewForm.aspx using Microsoft SharePoint Designer 2007 (i.e. http://<<sharepoint_servername:port_number/Lists/User Credential/NewForm.aspx)
    • Locate the <asp:Content ContentPlaceHolderId="PlaceHolderMain" runat="server"> tag and paste the following JavaScript just below the tag:

    <script language="javascript" type="text/javascript">

        _spBodyOnLoadFunctionNames.push("selectedAuthenticationMode");

        function selectedAuthenticationMode() {
            // to get the array for radio buttons
            var myRadioButtonsArray = getTagFromIdentifierAndTitle("input", "RadioButtons", "Authentication_x0020_Mode");
            for (var x = 0; x < myRadioButtonsArray.length; x++) {
                if (myRadioButtonsArray[x].value == 'ctl00') // per-user static authentication mode
                {
                    // create client event handler - onclick
                    myRadioButtonsArray[x].parentElement.onclick = function() {
                        // display username and password textbox                   
                        var controlUserName = findacontrol("Username");
                        controlUserName.parentNode.parentNode.style.display = "";
                        var controlPassword = findacontrol("Password");
                        controlPassword.parentNode.parentNode.style.display = "";
                    };
                }
                else // anonymous authentication mode
                {
                    // create client event handler - onclick
                    myRadioButtonsArray[x].parentElement.onclick = function() {
                        // unhide username and password field                   
                        var controlUserName = findacontrol("Username");
                        controlUserName.parentNode.parentNode.style.display = "none";
                        var controlPassword = findacontrol("Password");
                        controlPassword.parentNode.parentNode.style.display = "none";
                    };
                }
            }
        }

        function getTagFromIdentifierAndTitle(tagName, identifier, title, option) {
            var len = identifier.length;
            var tags = document.getElementsByTagName(tagName);
            for (var i = 0; i < tags.length; i++) {
                var idString = tags[i].id;
                var nameString = tags[i].name;
                // get selected radio button value only
                if (option == "value" && tags[i].type == "radio" && (identifier == "RadioButtons" && nameString.indexOf(identifier) == nameString.length - len)) {
                    var tagParentHTML = tags[i].parentElement.parentElement.parentElement.parentElement.parentElement.parentElement.parentElement.innerHTML;
                    if (tagParentHTML.indexOf('FieldInternalName="' + title + '"') > -1) {
                        var radioButtons = document.getElementsByName(nameString);
                        var radioValue = "";
                        for (var x = 0; x < radioButtons.length; x++) {
                            if (radioButtons[x].checked) {
                                radioValue = radioButtons[x].parentElement.title;
                                break;
                            }
                        }
                        var o = document.createElement("INPUT");
                        o.type = "hidden";
                        o.value = radioValue;
                        return o;
                    }
                }
                // get radio buttons group
                if (tags[i].type == "radio" && (identifier == "RadioButtons" && nameString.indexOf(identifier) == nameString.length - len)) {
                    var tagParentHTML = tags[i].parentElement.parentElement.parentElement.parentElement.parentElement.parentElement.parentElement.innerHTML;
                    if (tagParentHTML.indexOf('FieldInternalName="' + title + '"') > -1) {
                        return document.getElementsByName(nameString);
                    }
                }
                // all other input or select type
                else if (tags[i].title == title && (identifier == "" || idString.indexOf(identifier) == idString.length - len)) {
                    return tags[i];
                }
            }
            return null;
        }

        function findacontrol(FieldName) {
            var arr = document.getElementsByTagName("!");
            // get all comments
            for (var i = 0; i < arr.length; i++) {
                // now match the field name
                if (arr[i].innerHTML.indexOf('FieldInternalName=\"' + FieldName + '\"') > -1) {
                    return arr[i];
                }
            }
        }
    </script>

    • Save NewForm.aspx and preview in the Browser
    • Repeat the steps for EditForm.aspx

    Instead of having to create a new custom Web Part or a XSLT List Form page for a SharePoint List, this approach provides uncomplicated customization and the best thing is the out-of-the-box functionalities of the List Form View for a SharePoint List are still intact.

    Sample Screenshot

    • User chooses ‘Anonymous’ authentication mode radio button:

    UserCredential2

    • User chooses ‘Per-User Static’ authentication mode radio button:

    UserCredential1

    Wednesday, March 18, 2009

    How to Turn Off SharePoint Custom Error Message and Display Stack and Page Output Trace

    When error occurs in SharePoint, by default the following error message is displayed:

    20090111-2

    To see the "true" description of the ASP.NET errors along with the Stack and Page Output Trace messages, the following steps are required:

    • In Windows Explorer, browse to the following folder: C:\inetpub\wwwroot\wss\VirtualDirectories\{SharePoint Port Number} 
    • Double-click the SharePoint web.config file.
    • In the SharePoint web.config file, look for <customErrors mode="On" /> tag and change it to <customErrors mode="Off" /> - this enables the detailed ASP.NET errors to be shown to the remote clients and to the local host (You can also set the mode value to "RemoteOnly" so that the remote clients can see the Custom Error Message and the local host is shown with detailed ASP.NET errors.).
    • In the SharePoint web.config file, locate the <SafeMode MaxControls="200" CallStack="false" tag and change it to <SafeMode MaxControls="200" CallStack="true" - this enables you to received ASP.NET exception messages with stack trace information.
    • Next, in the <system.web> element, add the following line <trace enabled="true" pageOutput="true"/> - this enables you to use the tracing feature in ASP.NET to monitor the page output and environment variables of the local host.
    • Save and close the file.

    You will no longer see the SharePoint Custom Error Message page instead you get the "true" & "lovely" standard ASP.NET error page with the stack and page output trace as shown below:

    20090111-1

    SharePoint development has got that little bit easier!!.. I would recommend only making the following changes in a development environment and not production environment...